Awesome Screenshot Tips to Record and Capture Your Screen
Whether you are debugging a complex software issue, onboarding a remote team member, or creating instructional content, relying solely on text often leads to friction and miscommunication. Awesome Screenshot solves this by bridging the gap between real-time explanation and asynchronous documentation, letting you capture, annotate, and share visual workflows instantly.
Awesome Screenshot is a robust browser extension and screen-capture utility designed to streamline how you record screen activity, snap full-page screenshots, and annotate visual assets. Instead of scheduling a live meeting or writing lengthy emails, you can use Awesome Screenshot to demonstrate a process, report a bug, or document a workflow in seconds.
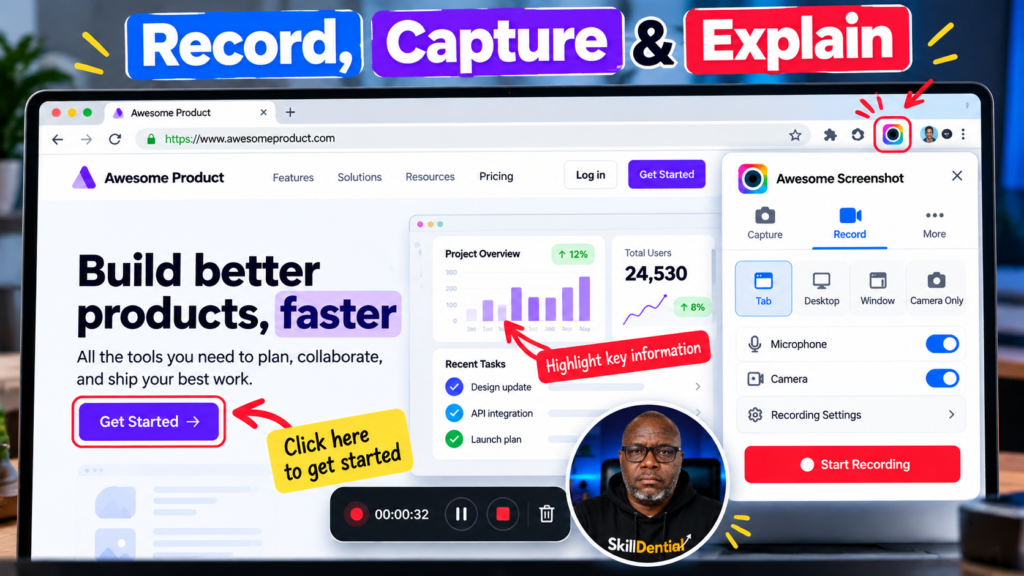
If you regularly work with browser-based applications, manage remote teams, provide client support, or create educational content, mastering Awesome Screenshot will significantly sharpen your operational efficiency. This guide covers how to set up the tool, leverage its core recording and annotation features, avoid common performance bottlenecks, and evaluate its pricing tiers.
What is Awesome Screenshot?
Awesome Screenshot is a versatile screen-recording and screen-capture tool available primarily as a browser extension, complemented by desktop applications for local workflows. By combining capture, multi-layered annotation, screen recording, and instant cloud sharing into a single utility, Awesome Screenshot eliminates the friction of traditional visual documentation.
According to its official Chrome Web Store listing, you can capture the visible viewport, a custom-selected area, an entire scrolling webpage, your full desktop screen, or a specific application window. Awesome Screenshot also lets you record browser tabs or system displays, add microphone audio and webcam overlays, and instantly generate shareable links.
Practical Applications by Role
By replacing lengthy text explanations and ad-hoc meetings with precise visual context, Awesome Screenshot accelerates workflows across distinct operational roles:
- Remote Teams: Share milestone progress updates and explain complex decisions asynchronously without scheduling live syncs.
- Developers & QA Testers: Document software bugs with exact reproduction steps and visual proof to streamline issue tracking.
- Designers: Pinpoint and highlight specific interface elements, layout bugs, or revision notes directly on visual assets.
- Customer Support Agents: Record step-by-step walkthroughs to demonstrate how clients can resolve recurring technical problems.
- Educators & Students: Produce concise instructional tutorials, classroom demonstrations, and detailed study explanations.
- Marketers & Freelancers: Capture client website feedback, record polished product demos, and deliver visual assets efficiently.
How to Install Awesome Screenshot
You can install the browser extension directly through the official Chrome Web Store by following these steps:
- Open the Extension Page
Navigate to the official Awesome Screenshot Chrome Web Store listing.- Verification: Confirm you are on the legitimate extension page hosted by
chromewebstore.google.com.
- Verification: Confirm you are on the legitimate extension page hosted by
- Select Add to Chrome
Click the blue Add to Chrome button in the top-right corner of the listing.- Verification: A confirmation pop-up window will appear asking for permissions.
- Review Permissions and Confirm
Review the permissions prompt and select Add extension to finalize the installation.- Verification: The extension icon will briefly flash or appear in your browser, and a welcome tab will open automatically.
- Configure Device Permissions (Optional)
Follow any built-in setup instructions if you plan to use microphone or camera recording features.- Note: You do not need to enable your microphone or camera for basic screenshot capture. Grant only the permissions required for the features you intend to use.
- Verification: Test your microphone or camera input within the extension settings if recording video.
- Pin to the Toolbar
Open Chrome’s Extensions menu (the puzzle piece icon on the top-right toolbar) and click the pin icon next to Awesome Screenshot for easier, one-click access.- Verification: The blue camera icon for Awesome Screenshot remains permanently visible on your browser toolbar.
7 Awesome Screenshot Tips for Better Results
The following techniques focus on making your screenshots and recordings easier to understand, not simply capturing more content.
Choose the right screenshot capture mode.
One of the most useful Awesome Screenshot tips is to select the capture area before taking the screenshot.
The tool supports several capture options, including:
- Visible area: Captures the part of the webpage currently displayed in your browser.
- Selected area: Lets you capture a specific custom section.
- Full page: Captures the entire webpage beyond the portion visible on your screen.
- Entire screen or application window: Helps when you need to document something outside an ordinary webpage capture.
These options are documented in the extension’s listing and official help centre.
When should you use each option?
If you want to show a single error message, capture the relevant section instead of the whole page. If you need to document a long article, product page, or form, a full-page screenshot may provide better context. For a desktop application, choose the appropriate screen or window capture option.
The goal is to include enough information for the recipient to understand the issue without overwhelming them with irrelevant details.
Capture full webpages without stitching screenshots together
A full-page screenshot is helpful when the important information extends below the browser’s visible area.
To capture a long webpage with Awesome Screenshot:
- Open the webpage you want to document.
- Click the Awesome Screenshot extension icon.
- Select the full-page capture option.
- Allow the extension to automatically scroll and capture the page.
- Review the result for missing sections, unexpected breaks, or layout problems.
- Annotate and save the image.
The exact menu labels may vary by extension version. The official help centre provides step-by-step instructions for capturing a full-page screenshot.
Practical tip: Long pages with dynamically loaded content, sticky navigation, animations, or unusual layouts may not capture perfectly. Inspect the resulting image before sharing it. If a page is too long to read comfortably as one image, split the information into smaller screenshots.
Annotate screenshots to make your point clear
An unmarked screenshot can leave readers wondering where they should look. Annotation helps you direct their attention.
Awesome Screenshot lists tools for adding arrows, lines, shapes, text, highlights, and blur effects. It also supports resizing and cropping screenshots.
Use these tools deliberately:
- Arrows: Point to a button, menu, error, or setting.
- Rectangles and circles: Outline an important interface element.
- Text labels: Explain what the recipient should notice or do next.
- Highlights: Draw attention to a key detail.
- Blur: Obscure sensitive information before sharing.
For example, imagine you are helping a colleague find a setting in a project-management application. Capture the relevant screen using Awesome Screenshot, draw an arrow towards the setting, and add a short label such as “Open this menu”.
Avoid covering important information with too many shapes or labels. One clear annotation is often more useful than several competing visual markers.
Record your screen with a clear explanation.
Screenshots are useful for showing a particular state, but a recording is often better when you need to explain a sequence of actions.
The Awesome Screenshot extension supports recording a browser tab, desktop, or camera-only view. Microphone narration and webcam overlays are available for supported recording modes.
A typical browser-recording workflow is:
- Open the page or application you want to demonstrate.
- Click Awesome Screenshot and select Record.
- Choose the appropriate recording source, such as a browser tab or desktop.
- Enable the microphone if you want to narrate your actions.
- Enable the camera if you want your face included and the selected mode supports it.
- Start recording and demonstrate the process at a steady pace.
- Stop the recording and review the result before sharing it.
The screen-sharing permission prompt may ask you to select the tab, window, or screen to capture. Available choices and camera behaviour depend on the selected mode. For example, the official guide notes that the camera feed cannot currently be included in its window-recording mode.
Recording tip: Plan your demonstration before pressing Record. Close unrelated tabs, prepare the page you need, and avoid unnecessary movements. A short recording with a clear objective is usually easier to follow than an unstructured walkthrough.
Use microphone narration to reduce confusion.
Voice narration is particularly useful when a viewer needs to understand why you are acting, not just see what happens.
When using Awesome Screenshot to narrate a workflow, explain:
- What the viewer is trying to accomplish.
- Which menu or setting they should open.
- What changes after each action.
- What to do if the expected result does not appear.
Before recording, check the microphone selected by your browser or operating system. Make a short test recording and listen for low volume, background noise, or missing audio.
If you are recording a meeting, customer interaction, or another person’s information, obtain any required consent before capturing or sharing it.
Save recordings locally or share a link.
After capturing a screenshot or recording with Awesome Screenshot, decide whether you need a local file or a shareable link.
The Chrome Web Store listing describes options for saving screenshots and recordings to a local device, uploading items to an account, and sharing links. It also lists screenshot downloads in formats such as PNG, JPG, and PDF, and recording downloads in WebM or MP4 where supported.
Use a local file when you want to keep a copy under your own file-management process. A shareable link can be more convenient for remote teams or clients who need to view a visual explanation.
To share an item stored in Awesome Screenshot’s cloud:
- Open your saved items.
- Select the screenshot or video you want to share.
- Choose the option to generate or copy a shareable link.
- Send the complete link to the intended recipient.
The official instructions explain that the complete shareable link may contain a key parameter. Copy the generated share link rather than assuming the ordinary address in your browser is sufficient.
Before sending a link, confirm that it opens as intended and that the recipient has the access needed to view it.
Use blur and cropping before sharing.
A screenshot can unintentionally expose information that is irrelevant to the task.
Before sharing outputs captured with Awesome Screenshot, inspect them for:
- Email addresses and phone numbers.
- Customer names or account details.
- Private messages and notifications.
- API keys, passwords, tokens, or other credentials.
- Internal documents or browser tabs unrelated to the demonstration.
Use the blur tool for suitable visible details, crop away unnecessary areas, or recapture the screen with sensitive information removed. The extension’s listed annotation features include blurring sensitive information.
However, do not treat blur as a guarantee that sensitive information is unrecoverable. For confidential material, the safer approach is to avoid capturing it in the first place or create a clean demonstration environment with fictional data.
How to Use Awesome Screenshot for Common Tasks
The best workflow depends on the problem you need to solve. By applying Awesome Screenshot to specific operational scenarios, you can replace lengthy text explanations with clear visual context.
Reporting a website bug
When dealing with software bugs, ambiguity slows down resolution times. Using Awesome Screenshot streamlines the debugging process for QA teams and developers:
- Capture the affected webpage or viewport showing the error.
- Use the annotation features in Awesome Screenshot to highlight the error or unexpected behavior.
- Add a short text note or arrow explaining what you expected to happen versus what actually occurred.
- If the bug depends on a sequence of actions rather than a static state, use the Awesome Screenshot recording feature to capture those steps asynchronously.
Creating a software tutorial
When onboarding new hires or demonstrating a digital product to clients, a structured video walkthrough is often more effective than static images:
- Open the relevant browser tab or system screen you intend to feature.
- Activate Awesome Screenshot, select your preferred recording source (tab or desktop), and enable your microphone for audio narration.
- Record the sequence at a steady, deliberate pace while explaining each action.
- Stop the recording and review the finished video using Awesome Screenshot to check for mistakes, audio sync issues, or unnecessary pauses before generating a shareable link.
Documenting a long webpage
Capturing long documentation, contracts, or expansive landing pages requires specialized handling to ensure readability:
- Navigate to the top of the target webpage.
- Trigger the full-page capture mode in Awesome Screenshot to automatically scroll and capture the entire document.
- Inspect the resulting image for missing content, broken dynamic elements, or layout glitches.
- If the generated image becomes excessively long and difficult to read, crop or divide the information into smaller, focused screenshots using Awesome Screenshot.
Giving design or client feedback
Design reviews require precise critique to prevent round-trip miscommunication between creators and stakeholders:
- Capture the target interface or design asset using Awesome Screenshot.
- Mark the exact UI component, alignment issue, or color code that needs attention using arrows, rectangles, or highlight tools.
- Write a concise text description detailing the requested change or revision directly on the capture canvas.
- Copy the secure share link generated by Awesome Screenshot and paste it directly into your project management tool, email, or messaging platform.
Note: These example workflows are structured around the tool’s documented capabilities to help you maximize productivity across common digital tasks.
Is Awesome Screenshot Free to Use?
Awesome Screenshot offers a functional free plan, but cloud storage, recording resolutions, and advanced editing features come with specific caps. Whether the free version is sufficient depends on how often you capture content, your video length requirements, and whether you rely on cloud sharing or local file management.
Free Plan vs. Paid Tier Comparison
| Feature Capability | Free Plan Limits | Paid Plans (Professional / Team) |
| Screenshot Storage (Cloud) | Up to 100 screenshots in your cloud account. (Unlimited if saved locally) | Unlimited cloud storage for screenshots. |
| Screen Recordings (Cloud) | Up to 20 total cloud recordings. | Unlimited cloud recordings. |
| Recording Duration | Capped at 5 minutes per recording when saving locally; downloadable/editable up to 1 hour. | Up to 6 hours per recording. |
| Recording Resolution | Capped at 720p. | Up to 4K resolution. |
| Editing & Annotations | Basic annotation and trimming tools. | Full suite of advanced editing tools and assets. |
Note: Pricing structures and feature limits are subject to change. Always verify current terms on the official Awesome Screenshot Pricing Page before committing to a plan.
Strategic Recommendation
Start with the free plan to test your intended workflow, evaluate its capture modes, and confirm whether local saving fits your operational pipeline. If your projects require high-resolution (4K) recording, extended video lengths beyond 5 minutes, or heavy team collaboration through cloud workspaces, upgrading to a professional tier is worth considering.
Advantages and Limitations of Awesome Screenshot
Awesome Screenshot combines several useful functions into a single tool, but it is not automatically the best option for every workflow.
Key Comparisons
| Advantages | Limitations and Trade-offs |
| Unified Functionality: Combines screenshot capture and screen recording in one browser extension. | Plan Dependencies: Features, recording lengths, and cloud-storage allowances depend heavily on your subscription tier. |
| Flexible Capture Modes: Supports full-page scrolling screenshots and precise selected areas. | Webpage Layout Quirks: Complex, infinite-scroll, or dynamically loaded pages may need manual checking or stitching. |
| Visual Explanations: Provides helpful annotation tools (arrows, text, blur) to direct recipient focus. | Visual Clutter: Over-annotating captures can make screenshots difficult to read and counterproductive. |
| Dual Storage Options: Supports local saving for data privacy and cloud-based sharing for fast collaboration. | Privacy Risks: Cloud sharing requires careful handling when sensitive or confidential information is visible. |
| Multimodal Recording: Can include microphone narration and webcam video in supported recording modes. | Configuration Overhead: Recording permissions, audio input settings, and capture modes must be configured correctly before recording. |
Platform Scope
Another important consideration is that Awesome Screenshot is primarily built as a browser extension rather than a full video-editing suite. It is exceptionally well-suited for short bug reports, async team updates, and visual walkthroughs. However, for complex productions, advanced multi-track audio processing, or elaborate visual transitions, you will still need a dedicated desktop video editor.
Privacy and Security Considerations
Because screenshots and screen recordings can inadvertently capture sensitive data, it is critical to evaluate your capture and sharing practices before deploying Awesome Screenshot in professional or educational environments.
The developer’s privacy policy outlines the collection of basic account information and usage telemetry. It notes that data may be handled by third-party service providers and transferred across international jurisdictions. However, the policy explicitly confirms that users can save recordings and screenshots locally on their own machines rather than relying on cloud storage.
Essential Precautions
- Review Extension Permissions
- Action: Grant browser permissions for camera and microphone access strictly on an as-needed basis.
- Verification: Check your browser’s site settings to confirm that permissions are not set to “Always Allow” globally.
- Protect Sensitive Information
- Action: Screen out private credentials before capturing content. Avoid capturing API keys, passwords, authentication tokens, internal company dashboards, private messages, or PII (Personally Identifiable Information).
- Verification: Inspect the viewport thoroughly for stray browser tabs, password manager prompts, or notification banners before capturing.
- Understand Cloud Sharing Access
- Action: Review permission settings on any generated cloud link before distributing it to colleagues or clients.
- Verification: Open the generated link in an incognito or logged-out browser window to verify what unauthorized viewers can access.
- Leverage Local Storage
- Action: Save confidential captures directly to your local device instead of uploading them to cloud servers.
- Verification: Check your local downloads folder or custom file path to confirm the file exists locally without a cloud URL attached.
- Verify Workplace and Institutional Policies
- Action: Check compliance requirements before installing or using third-party browser extensions on corporate networks or managed devices.
- Verification: Consult your IT department or acceptable use policy to ensure external recording tools are permitted.
Note: The Chrome Web Store displays developer data-handling disclosures, but these are general summaries. Always consult the official Awesome Screenshot privacy documentation and your organization’s internal compliance standards before handling confidential data.
Common Awesome Screenshot Mistakes to Avoid
Even a capable capture tool can produce confusing results if you use it without a plan. Keep these common missteps in mind to maintain professional, clear outputs:
- Recording before preparing your screen: Close unrelated browser tabs, background applications, and notification pop-ups before you hit record.
- Capturing too much information: Select the smallest viewport area or window that provides sufficient context rather than overwhelming the viewer with your entire screen.
- Ignoring audio quality: Always test your microphone input level and selected recording source before recording an important tutorial or walkthrough.
- Sharing without reviewing: Watch the complete recording or inspect the full-page screenshot for layout glitches or cut-off text before sending it to a client or colleague.
- Assuming every feature is free: Check current plan limits regarding cloud storage caps and video length restrictions before building a regular workflow around a specific feature.
- Sharing confidential information: Carefully check your capture for API keys, passwords, internal documents, or personal data before uploading or distributing files.
- Using screenshots when motion matters: Switch to a screen recording if the recipient needs to see a sequence of multi-step actions rather than a static state.
What is Awesome Screenshot used for?
Awesome Screenshot is used to capture screenshots, record screen activity, annotate images, and share visual explanations. It can help with software tutorials, bug reports, online lessons, design feedback, and remote collaboration.
Can Awesome Screenshot record my screen and voice?
Yes. The extension supports screen recording and microphone narration. It also supports webcam recording or an overlay in compatible recording modes. Available options depend on the selected capture mode and permissions.
Can Awesome Screenshot capture an entire webpage?
Yes. Its browser extension includes full-page screenshot capture, allowing you to capture content beyond the visible browser area. Review long captures for missing or incorrectly rendered sections.
Can I use Awesome Screenshot without paying?
Yes. Awesome Screenshot offers a free plan, but some cloud-storage, recording, editing, and annotation features are limited. Review the current pricing details before relying on a particular feature.
Can I share screenshots with other people?
Yes. You can generate a shareable link for screenshots saved to the service’s cloud. The official help centre explains how to create and copy the complete link. You should check the access settings and avoid sharing confidential content.
Is Awesome Screenshot available only for Google Chrome?
No. The developer provides extensions or add-ons for other supported browsers and offers separate desktop applications. Availability and feature sets vary by platform, so check the official website for the version that fits your device.
Is Awesome Screenshot safe for confidential work?
That depends on how you use it, the information you capture, your sharing settings, and your organisation’s policies. Review the privacy policy, minimise permissions, avoid recording sensitive data, and use local storage where appropriate. No tool should be assumed to be risk-free simply because it is available in a browser’s extension store.
In Conclusion
Awesome Screenshot can make everyday digital communication clearer by combining screen recording, screenshot capture, annotation, and sharing in one workflow.
The most effective approach is to choose the right capture mode, keep annotations simple, record only what the viewer needs to see, and review every file before sharing it. Pay attention to free-plan limits and privacy requirements, especially when working with clients, colleagues, or students.
Your next step: Install the extension from the official Chrome Web Store and test it on a non-sensitive webpage. Capture a full-page screenshot, annotate one important detail, and try a short screen recording. That will help you determine whether its features fit your workflow before you commit to a paid plan.